|
|
||
| Home | |
| How-To Listings | |
| General Information | |
| Common Problems | |
| Mondeo Revision History | |
| Contact / Disclaimer Info | |
| Links | |
| SITE MAP / CONTENTS | |
|
Water Ingress Problems: Water leaking into a car can be particularly annoying. With all brand new car designs there will be problems that get corrected as time goes on and improvements made, however there are a couple of common areas in which water can leak into the mondeo. Problem Area 1: Front Passenger Side Foot Well This is nearly always caused by a leaking pollen filter. Air enters the cabin via a filter hidden under the windscreen grill on the passenger side. With time this filter disintegrates and the seal strip around it fails allowing water to enter the ventilation system and drip onto the passenger side carpet and there are two methods used to help cure this. The first is for pre 95 cars which have the windscreen grill in the true sense that it is a grill - later models had a look-a-like grill that covered the pollen filter preventing water from dripping directly on to it. This also gives the added benefit of restricting the amount of "wet" air entering the cabin, thus reducing the amount of steam that builds up on the windscreen. Replacing the cover is a 10 minute job and Mk1 and Mk2 covers are interchangeable, so finding one shouldn't be a problem. To replace the grill follow the instructions below for replacing the filter: The second is replacing the filter. This should be done at 20,000 mile intervals or if you use the car a lot in dusty conditions. Of course variations will occur so use your own judgment as to when the air supply into the car feels restricted. Removing the covering grill is a little tricky the first time you do it, you'll need a size 27 thorx screwdriver and also a philips (+ style) screwdriver together with a small flat object for removing the blanking plates. Its held down by three thorx bolts and two plastic expanding plugs, opened via a screw.
With the bonnet open peel back the rubber sealing strip attached to the edge of the grill (A). Next undo and remove the three thorx bolts (B). Some models will have a plastic/rubber water deflector (D) which needs to be pulled off. Finally prise off the two screw cap covers (C) and loosen the screws underneath - these don't need to be removed, just slackened as all they do is open the plastic expanding plug. With all the retaining clips and bolts removed the grill will lift off - however this is the slightly tricky part as its held in place by lips that go under the drivers side of the grill and the passenger side wing. Its easiest to try and slide the grill to the right and free the lip under the other have of the grill first before extracting it from the wing side.
With it removed you'll be able to see the pollen filters plastic cover which is held in place by two metal spring clips, unclip these and lift out the cover - complete with old filter. The new filter should only fit one way and an arrow showing air flow is normally drawn on to it. HCF201 is the halfords code for the mondeo filter and costs about £8.50 (FINIS: 93BW-16N619-AB) When you have installed the new filter in the cover, replace it and ensure the metal spring clips are securing it correctly. It should be fairly tight and not wobble around much - if it isn't then check its sat on the base correctly and that nothing is damaged else water might still be able to penetrate it. Replace the grill cover (again its easiest to fit the wing side lip under first). Do up the thorx bolts first and then tighten the screws remembering that they only open plastic plugs and so don't get tight! Over tightening them will result in the plug snapping away from the grill. Remember to replace the rubber seal and if removed the deflecting strip (D) If this doesn't fix the problem you'll find whats happening is water is getting in between the filter housing and the bulkhead and then dripping down, again this is easily fixable but you'll need a size 13mm socket and some silicon seal. Turn off air distribution before doing this (set the direction switch to the O position) Follow the instructions above to remove the filter and assembly from the car, then undo the two 13mm bolts either side of the housing bolted to the bulkhead.
With these two removed you can withdraw the assembly and grill from the car entirely leaving with you access to the air intake as shown below
As you can see with this picture the water has been penetrating the seal and allowing water and rubbish to build up, note the mank on the grill (bottom right) which could have been sucked into the motor. The lip running around the intake hole is supposed to stop water from entering the cabin but unfortunately with a poor seal it runs around the lip and then down the gap between the bulkhead and the internal grill (arrowed). To fix this we need to first thoroughly clean the mating surfaces on both the bulkhead and the back of the plastic you just removed. Once they are clean apply a thick layer of silicone seal around the bulkheads lip and around the back of the plastic, then refit the assembly and bolt it back into position.
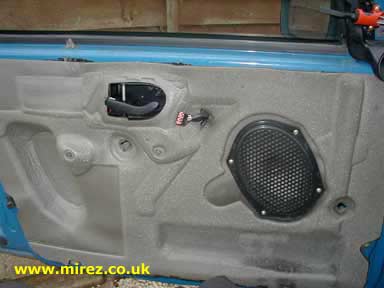
With it replaced use a little more to seal the gaps between the plastic and the lip from the inside as shown in the inset picture. If possible allow a couple of hours for the seal to set before replacing the filter and cover. Obviously because of where we are applying the seal, the car will smell of silicone every time you put the fan on for about a week afterwards but this will stop and keep the car watertight again. Problem Area 2: Drivers Foot Well Only really effecting early Mk1 mondeo's with cable driven speedos. There is a rubber seal on the cable as it enters the bulkhead (under the drivers side windscreen grill - removal the same as for passenger grill shown above). If its perished then water can enter and drip down on to the drivers side foot well including landing on the brake pedal! After removing the drivers side grill, examine the cable entry point for gaps. The cable won't move much so cover the entire entry point in silicon sealant or equivalent. Problem Area 3: Bottom of Doors Effecting a number of Mk3 cars (although it can effect Mk1 and Mk2 equally) this is caused by a poorly seated weather seal inside the car. Remove the door card and look at the foam panel stuck to the door, you can see in this photo the bottom right corner of this panel is beginning to rot and allow water through, the other common fault here is that the panel isn't properly stuck to the door. During the summer periods the glue heats up and can allow the panel to become unstuck and as a result water leaks into the car between the doorcard and door.
Problem Area 4: Boot Normally caused by a worn seal between rear light cluster and the body on Mk2's although a damaged weather seal around the boot would also cause problems. The clusters are removed from inside the car - disconnect the wiring connector and withdraw the bulb holding unit. You should see a number of bolts that hold the cluster to the body - remove all of these and pull the cluster from the outside to withdraw it. New gaskets are available from ford however using a clear setting silicone sealant works just as, if not better, then the gaskets. Mk1's can also suffer from leaking clusters although the problem is more likely to be a loose tailgate caused by wear/tear and vibration over the years - especially if your boot is very easy to close. Correctable by adjusting the locking mechanism's mounting bolts. With the boot open remove the screws on the rear plastic scuff panel. Then prise out the two larger plastic retaining lugs. Tug the panel to dislodge it and gain access to the mechanism.
The two retaining lugs are shown here as point "A" (Large Thorx Bolts) Slacken them both and work the mechanism a little lower. Tighten and attempt to shut the boot - it should shut easily with a little pressure, you shouldn't have to put a lot of effort into shutting it however you may find that a couple of attempts are required to get the position perfect. With the slack boot water is entering at the bottom of the boot seal but with an overtight boot it is likely to enter at the top of the seal so its important to get the tension right. Take your time and make small adjustments over time. Now when we looked at our own car it was worth noting that over the years the plastic scuff panel has scraped off the paint from under. The result was little patches off rust beginning to form, they were therefore treated with rustcure and later the area was painted and lined with a soft foam to stop reoccurrence. Therefore don't be to surprised if you discover rust when you do your own but it shouldn't be left untreated as over time it will spread. Problem Area 5: Sunroof Sunroof's have always been a cause for concern in wet weather however the mondeo sunroof is well designed - even with a damaged outer seal water shouldn't really be able to reach the cabin due to drain pan and pipes in all four corners of the sunroof. However if these get blocked then water won't be able to escape and so could leak into the car. If this is happening, or you have water in any of the four corners of the cabin then this should be checked. Behind the A pillar trims and the C pillar trims are the large black with white striped drain pipes. There are joints in there so undo and inspect for blockages. |
|
© Copyright Mirez - 24-Nov-2003 - All Rights Reserved. You may link directly to this page from your own however you may not change the content of this page or claim it as your own work.
|