|
|
||
| Home | |
| How-To Listings | |
| General Information | |
| Common Problems | |
| Mondeo Revision History | |
| Contact / Disclaimer Info | |
| Links | |
| SITE MAP / CONTENTS | |
Installing Interior Door Handle Lights This
was another standard feature on the higher spec-cars but can be
easily added. Time taken depends on what wiring loom your car came
with, it may be as simple as just pushing in the bulbs or you may
have to splice the supply from the electric window illumination
supply. If you have to splice the wires then look at about 2 hours
for completion.
You may need: (Depending on the wire loom in your car)
Alternatively:
You can get the bulb holders from Ford but I bet they will cost you a fortune and probably wont have the cables connected so the best thing to do it get the holders and a modest amount of cable from a scrapped Mondeo. I would suggest disconnecting the battery for this project - but its your call.
This for reference is what the bulb holders look like, they are inserted into back box of the door handle. Most dealers will tell you that they can't be ordered seperatly and you'll have to buy the entire door loom - use the FINIS code above to annoy them!
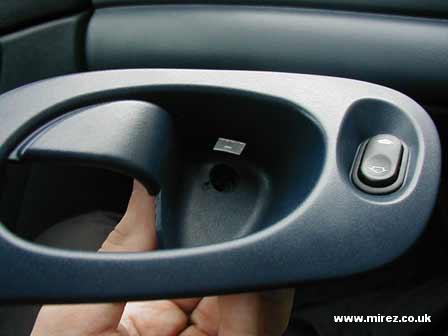
All MK1 mondeos came with door handle surrounds that had the light window and the space for the holder so its ready for the holder and light, You need to check if you have a MK2 or 3 that the surround has a window in it. Look up at the ceiling of the surround for a small window. The flash light has made this look a lot clearer then it is and in reality its quite a bit darker. First up you need to remove the interior door trim see this How-To for instructions : Door Card Removal Once down you need to peel back the insulation foam slowly to stop it ripping and it helps to use a hairdryer to warm the glue and then a stanley knife to slice through it. You only have to peel it back above the door handle and be careful not to cut any wires when you slice the glue. Now you should be able to see if the wiring is in place, its two wires - one orange and one black that'll go to the plastic surround of the door release. If its there on the front doors you are damn lucky and you *should* have the other 3 in place. This is looking down on the door and you can see the wires running into the holder. My car didnt have the wiring there so the colours are not the normal wiring. Orange and black is the normal wiring!! If its there then withdraw the holder from the surround and plug the bulbs into the sockets. The bulbs are a small push fit style, which is typically used to light the instrument panel, they are not W5W bulbs!! Turn the lights on to check they work and reassemble the panel. Go grab a beer and chill in the knowledge that those who don't are still reading the how-to! (Unless of course you want to fit coloured LEDs in which case read on ) Now for the rest of us you have to wire the lights yourselves. Its very easy to do and you have a choice of how you want to do it - with LED's or as stock. If you want the stock style you need to obtain the bulb holders before you cut any wires! Get them from a scrapped car and that way you'll have the wires already attached to the holders. The LED route you need to wire yourself up an LED and resistor combination and then make another 3 for the other doors! Typical resistance value is 340? (orange-yellow-brown) If you are not happy with electronics then I suggest you buy 12volt LEDs these have the resistor already in the housing and are more strait forward.
Right to wire the front you need to splice into the supply for the electric window switch illumination. Look at the connector and you should be able to easily find a black wire. Since the drivers side switch controls all 4 windows the wire is quite thick! This is the negative for the windows and you should slice into that one and connect the negative from the LED or the black wire from the holder to this wire. Solder the joint and insulate it using the tape. This
is the connector for the passenger window, under the tape is the
connections that I did, you can just see the orange wire with a
blue streak (Pin1) which is the illumination positive supply. You
can check this with a volt meter by pushing the probes into the
front of the connector, the meter should register 12v when the lights
are switched on regardless of ignition. If
you have gone the LED route you may need to remove the small plastic
window in this surround to enable enough light to pass. You can
see the LED poking through the hole above. Since the LED wont have
the holder make sure the legs are insulated and its either glued
or taped into position. Now
my LX model had no front wiring in place but the rear wiring was
there, if you dont have the rear wiring and you also dont have
electric windows then question if you really need to light up the
back! If you really do want to you are going to need to pass the
lighting feed into the door by removing the interior pillar trim
and its NOT a fun job!! Now it should end up looking something like this, remember this is taken during the day but it still gives off a soft diffused light around the surround. |
|||||||||
|
© Copyright Mirez - 22-Aug-2002 - All Rights Reserved. You may link directly to this page from your own however you may not change the content of this page or claim it as your own work.
|
|||||||||