|
|
||
| Home | |
| How-To Listings | |
| General Information | |
| Common Problems | |
| Mondeo Revision History | |
| Contact / Disclaimer Info | |
| Links | |
| SITE MAP / CONTENTS | |
Replacing Manual Mirrors for Electrically Adjusted Ones This is another one of those modifications that upgrades a part of your car to a higher specification level. GLX and above models had the electric mirrors as standard and they are also heated when you put the rear heated screen on. Some cars will already have parts of the wiring in place, there are three loom's in the car which you might have -
If you have one of those then don't assume you have any others without checking!! This
modification requires quite a lot of connections to be made and
can be a little tricky to complete in some areas. Set aside 4 hours
for the project although you should be able to complete it under
3.
You may need:
Alternatively:
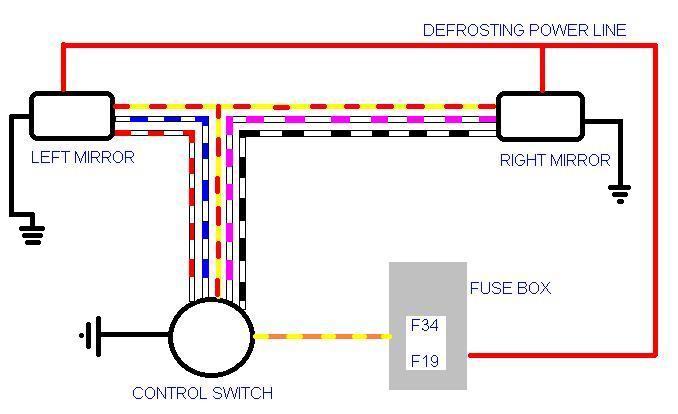
First up is to prepare the areas, you need to remove both front door cards and swap your old manual mirrors for the new electric ones. Once the door card has been removed you need to slacked the 3 retaining thorx screws then hold the mirror whilst you remove them. Replace with the new mirror and tighten up. The foam will stop the mirror from being pushed flush but as you do up the screws it will pull it back into line. With that done you need to prise out the cap that covers the mirror control switch. On some models you may find the wiring connector already behind this plug, if this is the case you may also have the wiring in the door. Check with a continuity tester to see, else you may have the wiring up until the door connector in the A pillar - The easiest way around this is to replace the door loom from a scrapped mondeo that had electric mirrors. (Ensure you get a 2 or 4 window control loom for the drivers side as they are different) If you don't have the wiring connector then fear not. Because of the number of wires involved what you need to do is make a loom rather then have lots of wires not grouped. Use different coloured cables for all the wires so you don't confuse them and over estimate all the lengths. You'll need to run three wires (Mirror Supply, Ground, De-Ice supply) from the fusebox up to the switches location where two will terminate. The other one will break into two and has to the go to both doors. Effectively doing a T joint (This is the power feed for the heating elements and so doesn't actually go into the control switch) You'll then need to run five wires to each mirror, wrap your wires in insulation tape so it resembles a large T. with the switch being the top of the centre bar We need to connect that now and then we can thread the loom back into the car. Start by connecting the two wires from your power feed. into the switch. Pin 4 (Black) is the ground and Pin 6 (Orange/Yellow) is the supply. With these two connected make the Y joint for the defrosting power line and insulate with tape. You now need to connect the other ten wires as shown above so that a total of 5 wires go to each mirror.
Two points to note here, 1) That you can't ground the de-ice supply back to the mirror control ground, take a wire back to the switch and connect before the ground enters the switch (As shown above) and 2) The Mirror control ground is spliced from the same terminal on the switch (Yellow/Red wire from pin 3) With all the wires connected at the switch.wrap the loom in insulation tape and slowly feed the loom back into the car.with the relevant spurs going to their section. Next up is to connect the loom at the mirror ends. Once the mirrors are connected back to your loom the only thing left to do is provide power for the control and de-icers and connect the ground supply . Start with the ground wire, this needs to be taken to a suitable ground point, the closest to the fusebox is down by the passengers front door, under the scuff plate. Its the same one used when we did the sunroof ground connection. Unbolt the bolt and using an O crimp connector, slide it over the bolt and retighten. Next up will be to connect your mirror control supply, remove the glovebox and lower the fusebox by pulling the black plug (see previous how-to's for further instructions). Looking from the front of the fuse box you'll see two rows of fuses, with relays running up the side, there are then two long connectors broken into sections. We want the furthest right connector and the second one up from the fuses. You should really disconnect the battery when making the connectors for safety reasons, if not however ensure that the ignition is OFF and that the mirror's control is also set to OFF. Reconnect the battery if you disconnected it, ensure that Fuses F19 (De-Ice supply) and F34 (Control Supply) are both in and in-tact. Check all connections are secure, taped and fully insulated. Turn on the ignition and test both mirrors work in all directions and that they are warm to the touch approximately 2 minutes after the REAR heated screen has been turned on. A final note that the mirror control is a permanent live, you can adjust them with or without the key in the ignition. |
|||||||||
|
© Copyright Mirez - 22-Aug-2002 - All Rights Reserved. You may link directly to this page from your own however you may not change the content of this page or claim it as your own work.
|
|||||||||